Jamie A. Environment – Cupboard Model and Texture.

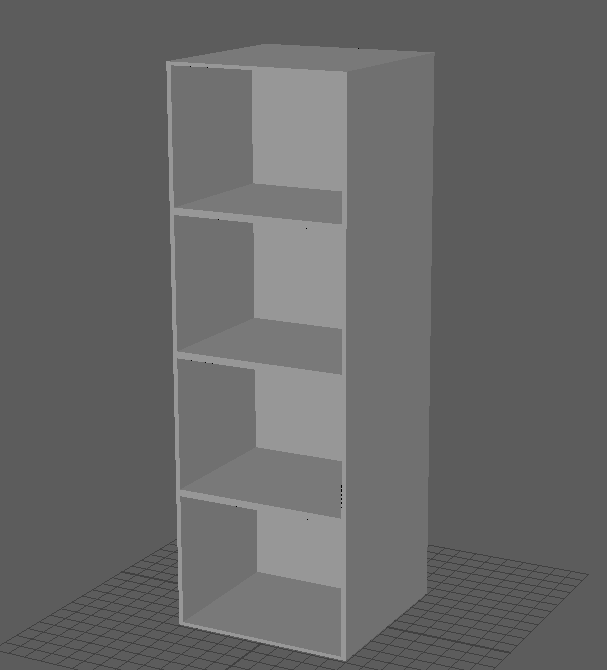
The cupboard was made in a rather quick and simple manner, as this is an object that will be used to store other ones as such its requirements are rather minimal.Cupboard

Starting off with a rectangle and placing an edge along the middle of it gave the model its inital split point and then all it required is the extruding of the faces created and the pulled into the model thus providing the shelves, and with a few more tweaks to enlarge the shelves the core part of the cupboard is done, next was the inclusion of some legs which are cylinders in the mode plain of terms and again have minimal work done to them outside of deleting unneeded faces that will not be seen.

Cupboard(Colour_Blockout)

With the base model done next was to add some colour to seperate the legs and cupboard parts as the idea for them is to create the cupboard from a plastic like material and for the legs to be metal.

Cupboard(Textured)

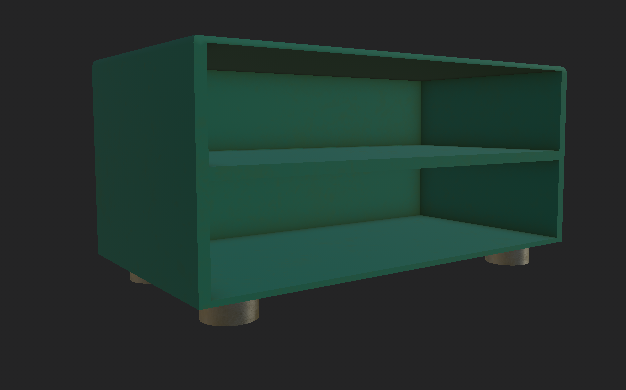
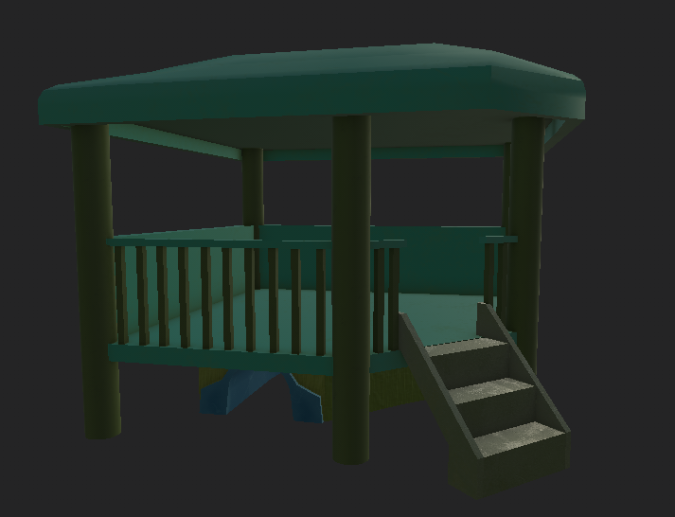
The material used for the cupboard is actually the same as the playhouse which is a lovely ability with texturing in a program that is designed for such things allowing for the texturing of assets in a quick manner, the same can be said for the legs which used a material included with the program and then modified to make it less reflective.

Jamie A. Environment – Jigsaw floor Model and Texture.

Next part is the Jigsaw floor pieces now this was rather fun to create as this both required the creaton of a number of floor sections but also the creation of several indents into the model and extrusions from the model to act as sections that connect jigsaws togeather.Jigsaw(Colour_Blockout)

Though the jigsaw parts are not smooth circles that are seen in alot of jigsaw puzzles I actually prefer it more this way as it helps to give the parts more character if you will while also helping to show off the beveled edges now the inclusion of these edges which works by adding more faces to the edges that are selected upon the model has put the number of faces the section uses to quite a high degree but it helps to give the pieces more depth and makes it more interesting to look at as these will be rather prominent in a section of the environment.


Unlike with other assets the jigsaw does not require multiple correct parts as its going to be just one flat colour that will be duplicated and tweaked to create several textures as this will allow for the mixing of different colours and to help break up the pattern of colours.

Jigsaw(Texture)Jigsaw(Texture_Blue)

As can be seen the materials and everything of the asset stay the same but with a simple tweak of the colour a enitrely new asset is created and thanks the sections all being the same in all sections it can be connect up to each piece in a quick and effective manner.

Jigsaw

An example of four jigsaw pieces connecting up, this can then be duplicated to rapidly create a jigsaw floor and then the textures simply dragged onto the assets in the game engine.

Jamie A. Environment – Playhouse Texture.

With the base model and colouring done the texture was the next to be made, now as substance painter is still fairly new to me the texture does not terribly good or well personally it does not but the group will have final say on that.

Playhouse(Textured)

The idea was to use a mix of similar colours with the bigger parts the roof and floor being of the same colour while the supports, rails and stairs being of a different colour this helps to break up the colours and also to experiment more with the materials as under the paints are layers of texture that help to augment the surface of the model, example of that is if you look at the stairs you can notice little splatter marks upon them this is a material that helps to give the model a more used look and feel, which as this is a playhouse its going to be used alot by the children.

The tunnel under the model was painted a different colour from the rest as I wanted it to stand out more it also fitted the material used which was an attempt to make it look more like plastic.

After completeing the texturing and stepping back to look at it, I noticed how empty it looked within the middle area which rather makes sense as with it being a childs play area one would expect a large amount of clutter to be placed around from toys, colouring items and general children items, but all in all I am somewhat happy with how it looks as was mentioned before but if the need to tweak it does happen then it is a fairly simple process so it will not harm the production time.

Jamie A. Environment – Playhouse Model.

The first asset to be shown will be the playhouse now this is a fairly large object as it will be pushed into a corner of the room and act as both a view blocker for people to hide behind or within while also helping to give the player the idea of just how small they are in comparison to everything else.

Playhouse

The idea for the playhouse comes from both research but also looking at the movie and game Toy Story 3, in toy story their is a large playhouse within the daycare room which both had a inner area upon a ramp but also a tunnel though the base of the playhouse this was an interesting idea and as such was incorporated into this asset, this both allows for a means of moving around the map but also to hide within and escape from the player who is chasing the person.

The asset is made up of five parts, the main body, the roof, the supports, the safety rails and finally the stairs, this allowed for the ability to move and tweak certain parts of the model until it was in a postion that was desired, it also allowed for the creation of corners as instead of having to make sure every part is align correctly it only required having to make the model push into the supports as can be seen in the image above.

Playhouse(Colour_Blockout)

With base model completed it was time to move onto colouring it now this wont bethe final texture but rather help in its creation as the program Substance painter has a lovely little feature that allows the program to notice the difference in colours of the asset and assign them their own layer within substance painter, this helps to split up the model so that a certain part can be focused upon and it helps to ensure that a material used on one part of the model does not appear on the rest of it this allows for multiple different material types to be used which makes sense as a playhouse is not going to be made of just one material.

Jamie A. Environment Update.

Explanation for no updates.

Over the past few months production of the environment assets has been slow going due to other personal problems as such this took abit of a back seat which in hindsight was a terrible decision but their was little choice in the matter.

With the problems having been resolved the production of the assets has increased once again and so far a large amount of the assets have been completed and modelled with only a few minor ones left to create, this period of focused work has allowed me to get into a good position with both modelling the assets and texturing the latter being the greater of the positons as the use of a program by the name of substance painter was used which up until focusing upon the work again had not been used all that much before as such it was a good learning experience having the ability to use program to texture several different assets.


Current Progress.

Currently several models have been created these are.

A Playhouse.

Toy Car Race track.

Toy Chest.

Cupboard.

Lego Pieces.

Jigsaw floor pieces.

Sqaure Table.

Round Table.

Each has been textured and is in a state where it can be added into the game when the group gets togeather again, these will also be talked about more in following posts.

Current items

Six of the assets (Non textured) along with a rectangle to show player size.

The remaining assets that have to be created are an additional floor part, the walls and window, a door and finally a ceiling a light source might also be created but with the window being present the ability to light the map up can be resolved with that.

If progress stays as it is then most if not all of the assets will be ready before next week and as such can allow for more tweaking and adjustments if need be.

Jamie A – An Overlook of Initial Model Creation – Prototype Room/Walls

The final prototype for now is the creation of the room, and the combination of the different assets create thus far, the room design might at a later date become bigger or smaller depending upon what the team says.

Room_1_001

An image from the side where the windows will be, this will allow for natural light to be let into the room, allowing for a mix of shadows and to help make the room seem larger than it is, these might be tinted slightly at the mid point downwards so that the player cannot look directly outside while still allowing for the light.

Room_1_002

This more shows where the door will be, at the end away from the play area helping to make sure a child cannot wonder off without the teacher knowning, in terms of design this is more to provide background for the player so they dont wonder why their is no door, this also shows off a large amount of space along the back of the room which could be used for a wide range of different assets.

Room_1_003

From here it shows off the play area more, which is hidden behind two partition walls, this allows for drawings and likes to be stuck upon it and in a normal sense to help keep the childrens attention on the teacher instead of the toys. This also shows a large sqaure right at the back, this at a later date will be a large raised area that could have slides going down it along with an assortment of different toys.

Room_1_004

This view is from the other wall side with said walls being turned into their wire mesh mode, this allows a look at several of the storage shelfs, with containers placed upon them, this allows for spaces to be plugged up that we dont want used and as means of places for players to hide behind or in it also helps to fill up the space and provide a means of additional decoration as explained in a previous post.

Room_1_005

And finally an overview of the room, as this is a prototype the rooms contents and the room itself can and will changed overtime till we are all happy with the end result, the next focus will be upon expanding the idea of four different area themes within the play area and so creating additonal assets which revolve around that.

Jamie A – An Overlook of Initial Model Creation – Prototype Wall Partition

Moving onto walls or well in this post wall partitions, now thats an interesting thing to find in a play area but they can be of a large amount of help as it allows for a wall for which to stick objects onto, act as a blocker between areas that you might not want the child to get into or see and to help break up the areas of the play area.Wall_Partition_1_001

they also help in this case to allow for each section of the map to have a background or sorts, in the forms of drawings relating to the specific areas so one of the areas would be a cowboy town, so the drawings stuck upon the partitions can show canyons and indian homes, all helping to set the mood for the area.

Jamie A – An Overlook of Initial Model Creation – Prototype Table

For the table it will be of a similar design to most regular tables only with added protection and being of a shorter height.

Table_1_001

As this is a table that is going to be used by children the sides of the table have to be rounded, this prevents major accidents as has been talked about in previous posts, so the edges in this case would be of a rubber material of a fairly thick manner this allows for the protection but also as a means for the child rest their arms against the table in a comfortable manner.

This also lead onto thinking about other different table types that can help to break away from just using the same one over and over so their can be round ones, the tables that grow smaller on one side or even just corner tables here and their.

Jamie A – An Overlook of Initial Model Creation – Prototype Shelf

For the shelfs a more basic design is rather the best here, nothing to complex or over the top will be needed as its design to just store objects when they are not needed, though this can act as a bed for added coverings to help split up the room into different sections as is the idea for the room.

Shelf_1_001

Shelf_2_001

As the design is meant to stay simple I have to think of ways to allow for additonal designs to be implemented this was achieved by increasing the walls and shelf thickness to give more of an idea to hang items off, I also made the spaces very wide allowing for either a large selection of different objects to be placed in their or for a container to be placed upon it and due to how these will most likely be placed at the sides it makes having to worry about the edges less of a well worry.

Jamie A – An Overlook of Initial Model Creation – Prototype Chair

Next we will move onto a chair, though in the final version their will be several different chair variants for now a focus upon one prototype allowed me to come up with some ideas on how to make look good but also safe for a child.

Chair_1_001

Though I need to reduce the chairs mass the basic shape is correct from what I remember, the legs are designed in a way to prevent the chair from being thrown over, with rubber soles along both ends of the pipe giving the chair a stable base, but still allowing the child to push and pull it around without much difficulty.

The chair part is interesting alot of chairs for children have a dip along the middle of the seat with the sides raised up, this helps to keep the child sat upon the chair in a comfortable manner and also reduces the chance of them by accident falling off it, though it does not stop them from doing that on purpose sadly, this also helps to strengthen the seat without making it rigid as a chair must have some movment to allow for a person shuffle around and make themselves more comfortable, it also allows for the chair to be made at a cheaper price as children will be using them their is a good chance that they will break, so having a cheap and comfortable chair is what most play areas will look for, as well as what kind of material they are made of with most being plastic as this allows for them to be easier to clean if say paint was dropped upon one along with allow for a wide range of different colours and patterns.