Jack R – Concept Art For Characters

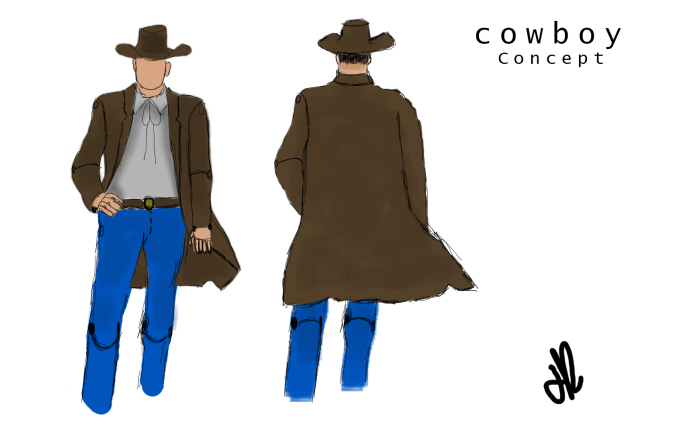
As the game is set in a school environment (Daycare) toys will be the main part about the environment, as for this the two main characters that you will be able to play as are toys. Based on one of the themes we have in the environment and the type of game that we are making it only seems right to make the characters for the game as a Cowboy and Bandit.

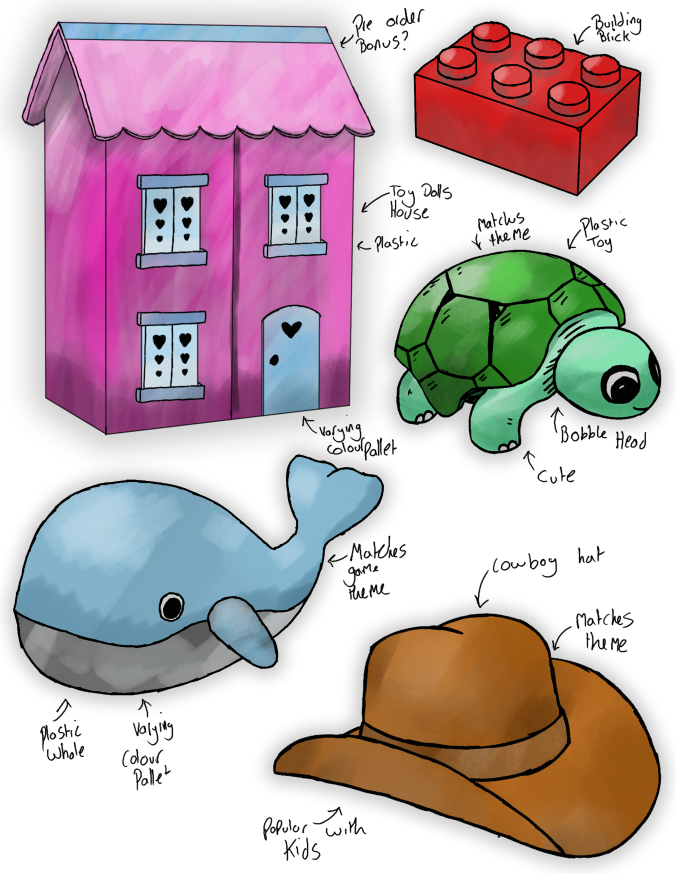
As the artist for the game I have looked into different toys and also looked into films such as toy story as our game is influenced by the day care scene for the film. From this I then went and started to draw up some ideas of what I would be able to create and also spoke to James about the different ways of being able to create the character movement and to set our mind on what type of toy it will be and to be settled on the type of toy it would be.

From talking to James I went away again and started to draw up the final versions of the concept art for the characters as you can see bellow. As you are able to see the joints on the characters will be different to a normal ball pivot of some action toys but with this it has a different joint system so that when creating the character within ZBrush I will be able to create the character more easily and then will be better for then creating the movement and the other animations for the characters its self. 24819234_1293536824124572_1294045076_o.png24946284_1293560870788834_417878928_o.png

Ryan W – Sound Design – Introduction

As the sound designer for the team, it is my duty to provide a library of sound effects and background music, and to work with our programmer to incorporate them into the game.

Our current aim for the final audio implementation is as follows:

  • One core backing track
  • Four themed backing tracks of different styles (sci-fi, western, rock, and pop), matching the four themed areas in the game (astronauts, cowboys, race cars, and doll house)  using the same motifs as the core track (optional)
  • A system to transition between tracks based on location, maintaining the same position in the melody (optional)
  • A library of sound effects for character and environmental actions
  • Main menu track and effects
  • Victory and defeat jingles
  • Ambient sounds of children playing outside that changes as time goes on (optional)

Below is my time chart for the project. Note that while there are only three allocated periods for producing music tracks, this also encompasses time for producing optional tracks.

(click for better view)

– Ryan W.

Jamie A – An Overlook of Initial Model Creation – Prototype Room/Walls

The final prototype for now is the creation of the room, and the combination of the different assets create thus far, the room design might at a later date become bigger or smaller depending upon what the team says.

Room_1_001

An image from the side where the windows will be, this will allow for natural light to be let into the room, allowing for a mix of shadows and to help make the room seem larger than it is, these might be tinted slightly at the mid point downwards so that the player cannot look directly outside while still allowing for the light.

Room_1_002

This more shows where the door will be, at the end away from the play area helping to make sure a child cannot wonder off without the teacher knowning, in terms of design this is more to provide background for the player so they dont wonder why their is no door, this also shows off a large amount of space along the back of the room which could be used for a wide range of different assets.

Room_1_003

From here it shows off the play area more, which is hidden behind two partition walls, this allows for drawings and likes to be stuck upon it and in a normal sense to help keep the childrens attention on the teacher instead of the toys. This also shows a large sqaure right at the back, this at a later date will be a large raised area that could have slides going down it along with an assortment of different toys.

Room_1_004

This view is from the other wall side with said walls being turned into their wire mesh mode, this allows a look at several of the storage shelfs, with containers placed upon them, this allows for spaces to be plugged up that we dont want used and as means of places for players to hide behind or in it also helps to fill up the space and provide a means of additional decoration as explained in a previous post.

Room_1_005

And finally an overview of the room, as this is a prototype the rooms contents and the room itself can and will changed overtime till we are all happy with the end result, the next focus will be upon expanding the idea of four different area themes within the play area and so creating additonal assets which revolve around that.

James L – Pre-Order Dolls House Development

After I finished developing my concept art I begun to develop a small Dolls House asset that could be used as a Pre Order Bonus for the game. I was thinking that this Dolls House could be the case that the game comes in or just an additional toy that releases alongside the games release.

I initially begun creating the asset via using the built in measurement tools inside of Maya. Once I had the correct measurements planned out I started to create the actual separate pieces of the asset e.g. Door, Windows etc.

2017-11-30_13h38_17

Because I knew that this asset was going to be used in 3D Printing I decided not to bother making a High Poly Mesh for baking; instead I just made the initial Mesh to a Higher Poly Count around points of interest, such as the rim of the roof…

Using a Seamless modular development Workflow I was left with the following Unwrap…

2017-12-04_10h45_22

At this stage I then ventured into Substance Painter in order to begin texturing the Asset. I used base Plastic Textures in order to give a realistic Plastic Effect. At this stage however I felt that the Mesh looked rather boring; in order to spice up the quality of the texture I made a range of Alpha Maps that can be placed all around the Mesh in order to make the asset look more interesting…

With the use of these Stencils and various other effects such as Rust and Dirt I was able to create the following effect…

2017-11-30_13h34_202017-11-30_13h35_34

I am rather happy with this asset but I personally feel that the Mesh is too cluttered with too much Information e.g. Leaves Everywhere! If I was to redevelop this asset I would simplify the textures and instead try to convey more information through the Mesh…

  • James L

James L – Merchandise Concept Art

Before I begin any form of product development it is important to generate ideas of various products that can be created as a part of my game Merch scheme. The following designs although all rather Unique could be implemented into a Merchandise scheme that works along side the release of the game to generate additional revenue.

MerchConceptArt

Out of the five designs I have presented above, I decided that it would be beneficial to begin developing the Dolls House as it will allow for me to experiment with developing an asset using a real time scale of Centimetres. This asset is also a very simple shape and therefore will be rather quick to develop and simple to unwrap.

  • James

Jamie A – An Overlook of Initial Model Creation – Prototype Wall Partition

Moving onto walls or well in this post wall partitions, now thats an interesting thing to find in a play area but they can be of a large amount of help as it allows for a wall for which to stick objects onto, act as a blocker between areas that you might not want the child to get into or see and to help break up the areas of the play area.Wall_Partition_1_001

they also help in this case to allow for each section of the map to have a background or sorts, in the forms of drawings relating to the specific areas so one of the areas would be a cowboy town, so the drawings stuck upon the partitions can show canyons and indian homes, all helping to set the mood for the area.

Jamie A – An Overlook of Initial Model Creation – Prototype Table

For the table it will be of a similar design to most regular tables only with added protection and being of a shorter height.

Table_1_001

As this is a table that is going to be used by children the sides of the table have to be rounded, this prevents major accidents as has been talked about in previous posts, so the edges in this case would be of a rubber material of a fairly thick manner this allows for the protection but also as a means for the child rest their arms against the table in a comfortable manner.

This also lead onto thinking about other different table types that can help to break away from just using the same one over and over so their can be round ones, the tables that grow smaller on one side or even just corner tables here and their.

Jamie A – An Overlook of Initial Model Creation – Prototype Shelf

For the shelfs a more basic design is rather the best here, nothing to complex or over the top will be needed as its design to just store objects when they are not needed, though this can act as a bed for added coverings to help split up the room into different sections as is the idea for the room.

Shelf_1_001

Shelf_2_001

As the design is meant to stay simple I have to think of ways to allow for additonal designs to be implemented this was achieved by increasing the walls and shelf thickness to give more of an idea to hang items off, I also made the spaces very wide allowing for either a large selection of different objects to be placed in their or for a container to be placed upon it and due to how these will most likely be placed at the sides it makes having to worry about the edges less of a well worry.

Anthony M – Warning and Capture Message Boxes

Today i will be editing current code to include message boxes that pop up when the Seeker is inside.

2017-12-01_11h54_26

Using a similar text from the timer, I made it so that when the game starts it will find the text component under a specific text name and it will automatically be disabled if it is enabled, when the seeker enters the collision box to capture the hider they will be prompted with a message saying that they should grab them.

2017-12-01_11h59_14

Here is when the Seeker is out of the range

2017-12-01_11h59_19

Here is when the Seeker is Within the range to grab.

2017-12-05_10h43_19

For the warning version of the text box I copied the code to find the text box and change the names in various areas ready to be used. I did try to apply it to the Seeker so when the Seeker is within range and detects the Hider then it would display the message, unfortunately the trigger would overlap and cause the capture code to trigger.

So I had to try another method and what I ended up doing was creating a empty game object as a child of the Hider and applied a Collider to it, as well as the code, it ended up working the way I wanted it to.

2017-12-05_10h43_11

This is what it looks like now, the outer Collider is the warning and the inner Collider is the capture area.

2017-12-05_10h45_25

Similar to the capture piece, it only appears when I am within the range.

2017-12-05_11h07_43

Here is what it looks like with both of the triggers active.

Links:

https://answers.unity.com/questions/612234/displaying-text-on-trigger-enter.html

https://answers.unity.com/questions/485667/detect-ontriggerenter-with-tags.html

https://answers.unity.com/questions/1324620/unity-ui-text-enable-and-disable-by-a-c-script-1.html

https://answers.unity.com/questions/170610/multiple-triggers-on-one-object.html

Anthony M – Making the Timer

2017-12-01_10h20_21

To create the timer I just followed 2 guides and took the pieces that I needed, I knew it was to do with time.deltatime but i wasn’t too sure how to write it.

The timeLeft float is the main piece of code that will affect the start time, the rest of is is what will make it go down.

I can easily change anything i need, the parts in the comments was a piece of code i thought might work but didn’t, its something that can be explored later

2017-12-01_09h44_31

Since a majority of the code is private, this is what it looks like when its all public, the text part allows you to apply this code to a different object but you would have to dedicate the text component of the UI to it.

2017-12-01_09h44_42

The text box can be changed anytime, location wise and size wise, i just made the placeholder large enough for the numbers to be visible along the top centre of the screen.

2017-12-01_09h44_48

As seen here the timer is counting down from the 5 minutes that i imputed as the start time.

links:

https://answers.unity.com/questions/980339/count-down-timer-c-1.html